
Inhaltsverzeichnis
ESP8266 WiFi Modules
30.10.2014
I just stumbled over a very cheap possibility to add WiFi connection to simple micro-controller-based applications. 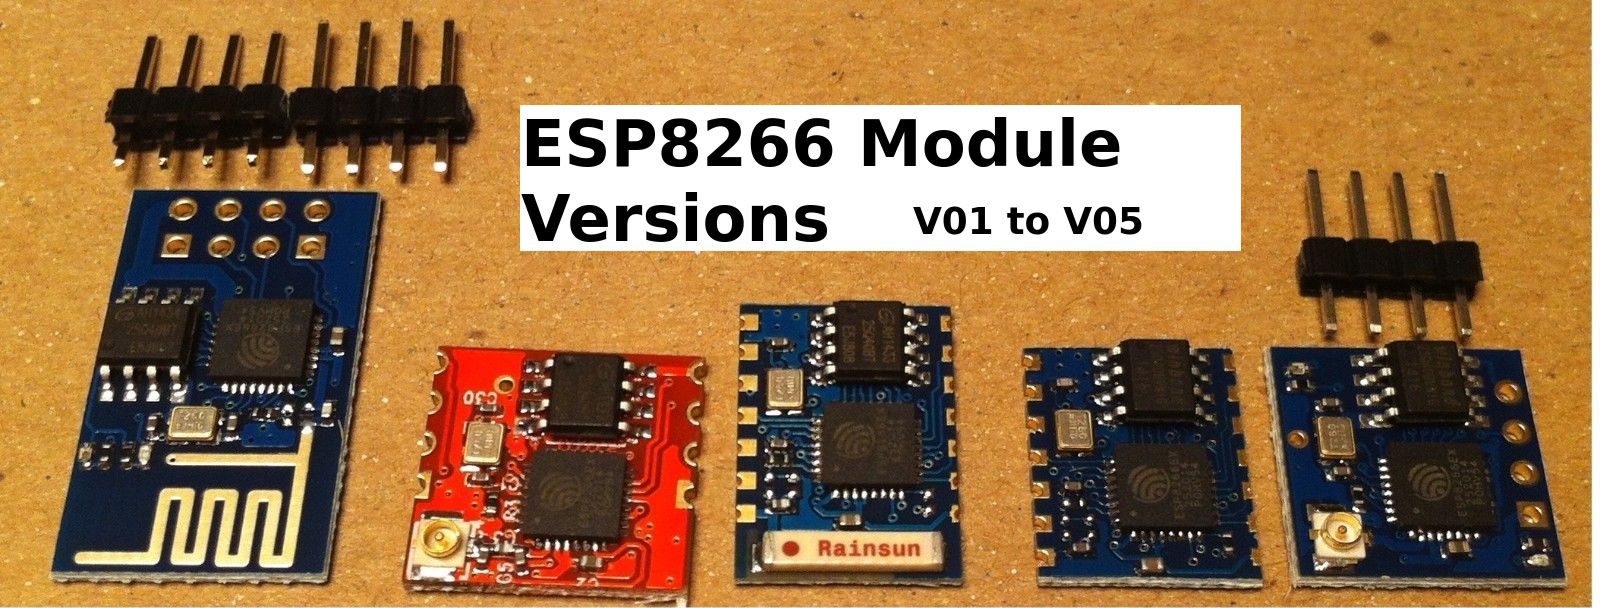
It's price is 2-5 USD on eBay, which is very interesting for simple projects.
The communication is via a 3.3V UART, with AT-commands.
This module supports TCP and UDP, both as a server or a client, which is pretty awesome!
Version 2 has an IPEX (U.FL) connector. A possible antenna coudl be this one from Farnell#1900063
Documentation Sites
My experience
2.12.2014
Schematic for testing
Communication
I'm using CuteCom on /dev/ttyUSB0 with 9600baud/s, no parity, 1 Stop-Bit
The USB-UART chip is a CH340G from WCH. It is recognized by Kubuntu without any driver installations.
For direct communication from the PC to the WiFi module, the ATmega-328 is disabled by pulling the RST-line to GND.
On power up we get this message on the CuteCom terminal:
\0xc8DtP\0xa4\0xf8B\0xb6E\0xb4\0x86\0xc8`CXR\0xc0D\0xd0\0x04ixI\0xc0M\0xf9\0xe0:\0x07\0xa4
[Vendor:www.ai-thinker.com Version:0.9.2.4]

ready
Join a WiFi access point
AT+RST
OK
V\0x08\0x88\0xa0\0xd1\0x0c)B\0xeb`!\0x8e\0xc7\0x9c\0x8c\0xc7J\\0x08\0x80\0xfc
[Vendor:www.ai-thinker.com Version:0.9.2.4]
ready
AT+CWMODE=3
no change
AT+RST
OK
\0xa5\0xfcv\0x8c\0xff\0x08\0xa9\0xfc@F\0x01
(\0xe2\0x9e\0x9a*\0x87F\0xe5\0xfc
[Vendor:www.ai-thinker.com Version:0.9.2.4]
ready
Look for access points:
AT+CWLAP
+CWLAP:(4,"MKZ",-58,"30:91:8f:28:f5:df",1)
OK
Join access point ( is shared key):
AT+CWJAP="MKZ","********"
OK
Check if it is connected:
AT+CWJAP?
+CWJAP:"MKZ"
OK
Ping it
In order we can ping the module, we have to find out the IP address. This we get either by looking into the webinterface of the accesspoint, or by following AT command:
AT+CIFSR
192.168.4.1
10.0.0.2
OK
I think, the first IP address is an internal IP address of the module. The second one is the IP address, that the DHCP on the access point assigned to the module.
When we open a terminal on Kubuntu and ping it:
karl@lenovo-w520:~$ ping 10.0.0.2
PING 10.0.0.2 (10.0.0.2) 56(84) bytes of data.
64 bytes from 10.0.0.2: icmp_seq=1 ttl=255 time=67.1 ms
64 bytes from 10.0.0.2: icmp_seq=2 ttl=255 time=294 ms
64 bytes from 10.0.0.2: icmp_seq=3 ttl=255 time=214 ms
64 bytes from 10.0.0.2: icmp_seq=4 ttl=255 time=135 ms
64 bytes from 10.0.0.2: icmp_seq=5 ttl=255 time=61.2 ms
64 bytes from 10.0.0.2: icmp_seq=6 ttl=255 time=279 ms
64 bytes from 10.0.0.2: icmp_seq=7 ttl=255 time=200 ms
64 bytes from 10.0.0.2: icmp_seq=8 ttl=255 time=326 ms
64 bytes from 10.0.0.2: icmp_seq=9 ttl=255 time=42.1 ms
64 bytes from 10.0.0.2: icmp_seq=10 ttl=255 time=482 ms
64 bytes from 10.0.0.2: icmp_seq=11 ttl=255 time=195 ms
64 bytes from 10.0.0.2: icmp_seq=12 ttl=255 time=111 ms
64 bytes from 10.0.0.2: icmp_seq=13 ttl=255 time=32.7 ms
^C
--- 10.0.0.2 ping statistics ---
13 packets transmitted, 13 received, 0% packet loss, time 12015ms
rtt min/avg/max/mdev = 32.722/188.055/482.747/127.476 ms
As we can see, the average response time of 188ms is quite long. But hey, I don't want to use the module for high speed low latency applications. I want to measure temperature and switch on or off a heating system.
Testing it as a TCP client
AT+RST


OK
?0\0xb8t\0xfe\0x08f\0xf4(\0x00\0x08\0xe3\0x9dn@h\0x15\0xca\0xff@
\0xff
[Vendor:www.ai-thinker.com Version:0.9.2.4]

ready
AT+CWJAP="ssid","key"


OK
AT+CIPSTART="TCP","www.zeilhofer.co.at",80


OK
Linked
AT+CIPSEND=43

> GET /php_learning/helloworld.php HTTP/1.1

SEND OK
AT+CIPSEND=30

> Host: www.zeilhofer.co.at:80

SEND OK
AT+CIPSEND=2

>

SEND OK

+IPD,170:HTTP/1.1 200 OK
Date: Tue, 02 Dec 2014 13:46:03 GMT
Server: Apache
Connection: close
Transfer-Encoding: chunked
Content-Type: text/html

14
Hello World!<br>


OK

+IPD,5:0


OK
As we can see, we get the desired response from the webserver. The HTTP message body is „chunk“-encoded. I interpret this so, that each chunk is preceeded by the length of the chunk. The number is in bytes, and encoded as a hexadecimal number. A chunk is terminated with a <CR><LF>
Lets decode the message above in details:
+IPD,170:
this is sent from the WiFi module, and tells the terminal, that data from the open TCP connection is received. The data has 170 bytes.
HTTP/1.1 200 OK<CR><LF>
17 bytes: This is the HTTP status line. For details click here: http://www.w3.org/Protocols/rfc2616/rfc2616-sec6.html
The line is terminated with <CR><LF>.
Date: Tue, 02 Dec 2014 13:46:03 GMT<CR><LF>
37 bytes: From the server we get the current date and time
Server: Apache<CR><LF>
16 bytes: The server tells us, that it is an Apache server.
Connection: close<CR><LF>
19 bytes: The connection is closed by the server after the message is transmitted. This is because we did not tell the server to keep the connection alive (we could add Connection: keep-alive to the HTTP-GET message header).
Transfer-Encoding: chunked<CR><LF>
28 bytes: the message body is transmitted in chunks.
Content-Type: text/html<CR><LF>
<CR><LF>
2 bytes: end of http-message-header
Body:
14<CR><LF>
4 bytes: hexadecimal block length = 20 decimal
Hello World!<br><Space><LF>
<Space><LF>
20 bytes message body.
<CR><LF>
2 bytes empty line, which terminates the first chunk <CR><LF>
OK
+IPD,5:0
OK </code>
TCP Server Example
Attention: the linebreaks are modified for better readability
AT+RST
OK
c_\0xc7\0xcfRS\0xfe\0xe2FjS\0xf6fJ[\0xfa\0xe2\0xea
[Vendor:www.ai-thinker.com Version:0.9.2.4]
ready

AT+CWJAP="SSID","key"
OK

AT+CIPSTATUS
STATUS:5
OK

AT+CIPMUX=1
OK

AT+CIPSTATUS
STATUS:5
OK

AT+CIPSERVER=1,47000
OK

AT+CIPSTATUS
STATUS:5
OK

Link

AT+CIPSTATUS
STATUS:3
+CIPSTATUS:0,"TCP","192.168.1.105",50583,1
OK

+IPD,0,44:hello server, this is the client (lenovo)

OK

STATUS:3
+CIPSTATUS:0,"TCP","192.168.1.105",50583,1
OK

AT+CIPSEND=0,52
> Hello Lenovo, thank you very much for your request
SEND OK

+IPD,0,44:no problem, thank you for serving me. ciao
OK

Unlink

AT+CIPSTATUS
STATUS:4
OK
A server is opened on a specific port. To this port there can be up to 5 connections in parallel, TCP and UDP mixed. When responding, we have to set the 'mux' ID, which can be from 0 to 4. Each new incomming connection (For simplicity I name also UDP packets a „connection“ here), the ID will be increased, and we can see the active connections with CIPSTATUS.
If we have multiple incomint TCP-connections from one client (multiple processes), we get multiple connections in the CIPSTATUS-list. Each with it's own reply port.
But if we get multiple UDP connections from one client (also different client-processes), only the most recent one is stored in the CIPSTATUS-list, even though they have different reply ports.
CIPSTATUS Example
AT+CIPSTATUS
STATUS:3
+CIPSTATUS:0,"TCP","192.168.1.105",50618,1
+CIPSTATUS:1,"TCP","192.168.1.105",50626,1
+CIPSTATUS:2,"UDP","192.168.1.105",37690,1
OK
Here I opened 4 instances of the application „SocketTest v 3.0.0“ on my notebook, and opened 2 TCP connections, and sent 2 UDP packets (broadcasts). But we can only see 3 active connections here.
Notes
When we close the server with
AT+CIPSERVER=0
, then the module has to be resetted!
As far as I know, we cannot find out, on which port the server was opened.
We can find the own IP address with
AT+CIFSR
. Note, that there is no questionmark!